
Plan a patio that fits how you use it
Pea Gravel Patio: Planning, Installation and Maintenance
Chair legs sinking into loose stones, gravel spreading into the lawn and puddles appearing after rain can turn a simple patio into a recurring repair job. These problems often begin with decisions about the ground, borders and furniture before the gravel is delivered.
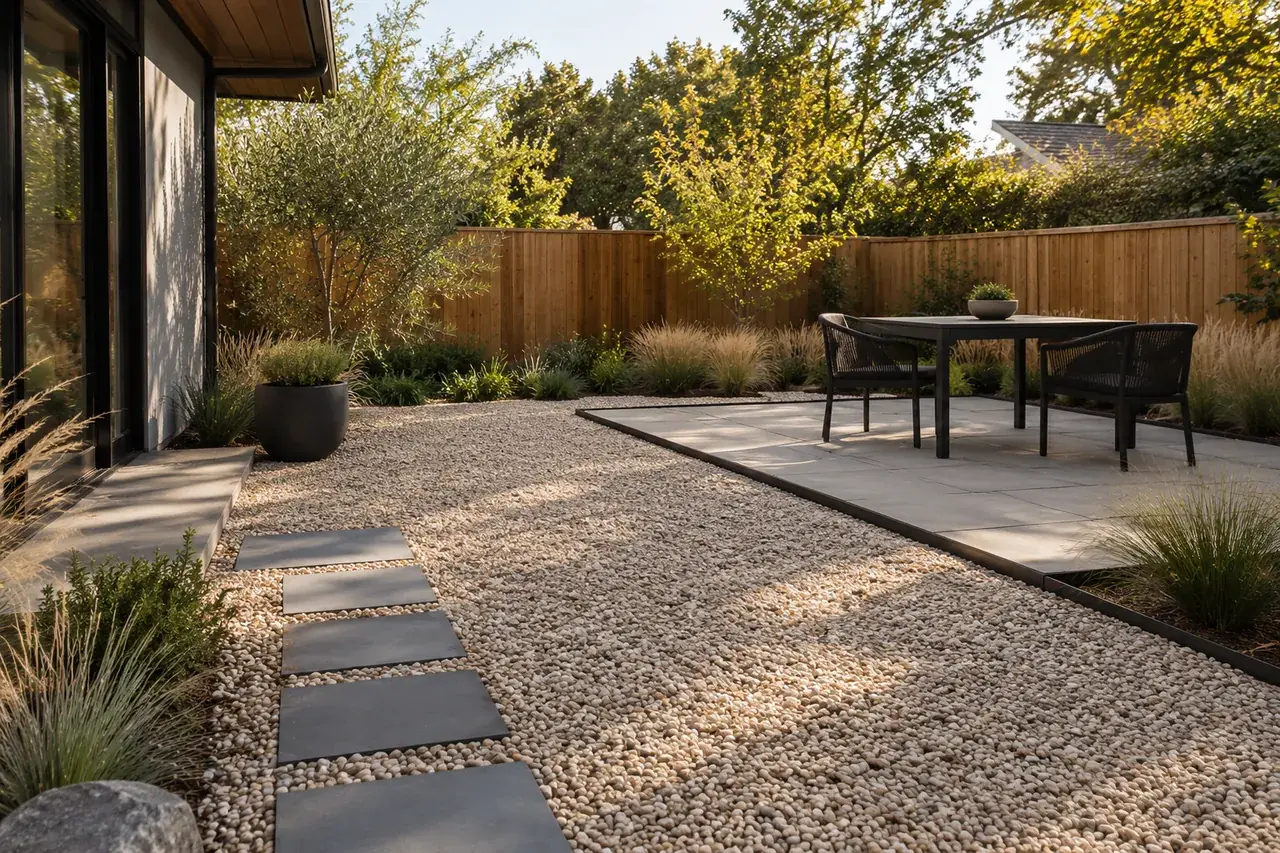
A well-planned pea gravel patio starts with how you want to use the space. Choosing a suitable layout, checking drainage and planning stable seating areas will help you decide whether loose gravel, a stabilization system or a mixed surface fits your needs.
This guide walks through planning a gravel patio, choosing its components and organizing installation. It also explains furniture support, maintenance and how to prepare a material order without overlooking the work beneath the finished surface.
01 / Plan the project
Pea gravel patio planner
Build a practical brief for the layout, supporting work, borders and maintenance. Add measurements when available and keep quoted costs separate.
Enable JavaScript to use the planner. The page’s static content remains available.
Your inputs stay in this page session. Copy or download your brief before leaving. No supplier inquiry is sent.
The planner organizes decisions and measurements. Confirm the selected assembly and actual supplier products before ordering. Use the pea gravel calculator for volume, weight and bag quantities.Open the pea gravel calculator
Measure. Check. Plan.
Measure your project
Record dimensions and separate layers before estimating.
Use the right basis
Check product specifications, units and supplier quote inclusions.
Keep your project record
Save your inputs and estimate with the print control.
Example layout
Plan each construction layer
Four project milestones
On this page
Is a Pea Gravel Patio Right for Your Yard?
Pea gravel consists of small, rounded stones. Confirm the actual size, color and grading with your supplier before using it for a patio.
Before choosing it, consider what will happen on the patio each day. A quiet seating corner has different requirements from a dining area where chairs move repeatedly or a route used by someone with a mobility aid.
Use these questions to establish your priorities:
- Will furniture remain in place or move frequently?
- Do you need a firm route between the house and garden?
- Are you comfortable with occasional raking and stone replacement?
- Can the patio have secure borders?
- Does the proposed location remain wet after rainfall?
Test the Furniture Before Committing
Try the actual chairs and table on a representative gravel sample, where possible. Check whether chair feet settle, whether the table rocks and how easily a seated person can move their chair.
Treat furniture support as part of the patio layout. Try the intended chairs and tables on the chosen surface and provide a stable seating area where small furniture feet would sink or shift.
Choose Between Loose Gravel, Stabilized Gravel and a Mixed Patio
These options require different plans.
Loose gravel: Plan the surface, borders and maintenance around stones that can move.
Stabilized gravel: Choose a specific grid system, then follow its requirements for the ground, aggregate and installation.
Mixed patio: Allocate solid areas for selected activities and use gravel elsewhere.
A stabilization grid contains aggregate within cells. CORE’s instructions distinguish base preparation, panel placement, filling and finishing; purchasing a grid does not eliminate the work beneath it.
A Mixed Surface Can Solve Specific Problems
Consider a solid dining area surrounded by gravel, or a continuous paved route leading to a gravel seating area.
Draw the zones separately. Include the supporting construction and transitions for each surface in the material list.
A solid seating platform can be combined with a gravel border. Decide which activities belong on each surface, then deduct the solid platform from the gravel-covered area.
Compare Patio Surfaces by How You Will Use Them
Avoid choosing a surface solely from a photograph.
| Your priority | Options to investigate | What to check |
|---|---|---|
| A loose stone appearance | Pea gravel or another decorative gravel | Actual sample, containment and maintenance |
| Less aggregate movement | A specified stabilization system | Compatible stone and complete installation requirements |
| Frequent chair movement | A solid seating zone or suitable mixed layout | Furniture movement and surface transitions |
| A reliable mobility route | An appropriately designed firm surface | Continuity, firmness, stability and maintenance |
| Several activities in one patio | Separate surface zones | How the zones connect and drain |
The U.S. Access Board explains that loose gravel generally needs sufficient stabilization to perform as an accessible surface. A gravel product or grid should not automatically be described as accessible without evaluating the completed assembly.
Plan Access Alongside the Seating Area
Think about the journey to the patio, not just the space around the table.
Include the doorway, thresholds, route across the yard and transitions between materials. Where users need a firm surface, make that route continuous rather than relying on isolated stepping stones.
Access Board guidance emphasizes firm, stable surfaces and identifies uneven surfaces as potential difficulties for wheeled mobility aids. Use those principles when comparing layouts; requirements for a particular property depend on its circumstances.
Mark the Layout Before Ordering Materials
Use stakes, string or marking paint to outline the proposed patio.
Place your furniture within that outline. Open doors, move chairs back from the table and walk around the occupied seats.
Adjust the layout before measuring. This simple exercise gives you an area based on actual use rather than an arbitrary rectangle.
Record More Than the Patio Area
Your measurement sheet should include:
- Overall patio dimensions.
- Areas reserved for another surface.
- Outer border length.
- Openings and transition details.
- Delivery and wheelbarrow access.
- The location of existing drains or other features.
Photograph the marked layout and keep it with your material list. This makes supplier and installer conversations easier.
Check Drainage Before Adding Gravel
Water passing between surface stones still needs somewhere to go.
Observe the proposed location after rain. Record where water arrives, where it collects and whether the ground beneath the area remains wet.
NDS explains that its permeable gravel paving system works best where the subsoil can infiltrate water, and that poorly draining soil may require an underdrain. A permeable-looking surface does not, by itself, resolve the drainage arrangement.
Identify the Water Path
Before excavation, establish:
- How water reaches the patio.
- Whether the ground can accept it.
- Where excess water will discharge.
- Whether borders or adjoining surfaces affect that route.
If these answers are unclear, resolve them before buying the surface material. Keep drainage work as a separate item in the project budget.
Plan the Construction Beneath the Surface
There is no single layer arrangement that suits every gravel patio.
A loose patio and a proprietary grid system can have different requirements. Existing ground conditions and intended use also affect the preparation.
CORE’s design guide states that installation depends on intended use, traffic and ground conditions. Obtain guidance for the actual system and site rather than transferring a driveway detail to a pedestrian patio.
Use a Layer Schedule
Complete this schedule before ordering:
| Component | Decision to record |
|---|---|
| Existing ground | Condition and preparation needed |
| Separation or filtration layer | Required function and specified product |
| Supporting aggregate, if required | Grade and finished thickness |
| Bedding or leveling layer, if required | System-specific material and thickness |
| Stabilization grid, if selected | Exact model and installation instructions |
| Surface gravel | Actual product and required placement depth |
| Borders and transitions | Product, support and finished elevations |
This is a planning checklist, not a universal construction cross-section. For separately specified supporting aggregate, compare the material roles in the 57 stone and gravel types guide.
Do You Need Fabric Beneath a Gravel Patio?
First identify what the fabric is expected to do.
Soil separation, filtration and weed suppression are different functions. A product selected for one purpose should not be assumed to provide all three.
Some grid systems already include a geotextile backing. NDS, for example, describes an attached fabric intended to limit downward gravel migration while allowing filtration. Check the system instructions before adding another layer.
Fabric Does Not Make the Patio Weed-Free
University of New Hampshire Extension explains that soil or mulch accumulating above landscape fabric can support weeds. Its discussion concerns planted beds, but it demonstrates why a buried barrier is not a permanent guarantee against surface weed growth.
For the patio, include debris removal and weed checks in the maintenance plan. Keep decisions about nearby planting beds separate from the patio’s construction requirements.
Choose Edging Before Setting the Finished Height
Edging needs to suit the selected surface assembly and its surroundings.
Compare how each option will handle curves, corners, entry points and changes between lawn, gravel and paving. Ask how it is secured and how the finished gravel level relates to its top.
CORE’s design guide lists several possible edging materials and ties their suitability to installation, ground conditions and intended use.
Edging Comparison
| Option | Useful questions before buying |
|---|---|
| Metal edging | Which stakes and connectors are required? How are exposed ends finished? |
| Paver or masonry border | What support and restraint does the border need? |
| Timber border | Is the product suitable for the intended exposure and installation? |
| Plastic or composite edging | Is it rated for this application, and how is it anchored? |
For example, Colmet supplies steel edging with an attached-stake system. Follow the chosen product’s fixing details rather than improvising stake spacing or connections.
Plan Entry Points Separately
A border that contains gravel also needs a usable transition where people enter.
Draw that transition before installation. Record how the gravel will remain contained and how the adjacent surface will meet it.
Avoid leaving this detail to be solved with leftover materials at the end.
How to Organize Pea Gravel Patio Installation
The following sequence provides checkpoints for the work. Exact materials, depths and fixing details must come from the selected assembly and site plan.
Step 1: Finalize the Layout and Materials
Confirm the dimensions, surface zones, borders and drainage arrangement.
Create a material list with separate lines for each component. Obtain the relevant product instructions before starting.
Step 2: Arrange Utility Locating Before Excavation
Contact 811 before digging and follow your state’s process and required notice period.
The U.S. Department of Transportation identifies 811 as the national resource for helping prevent excavation damage to underground utilities.
Step 3: Establish Excavation and Finished Levels
Calculate excavation from the complete planned assembly.
Account for supporting layers, any grid, surface gravel and adjacent thresholds. Arrange where excavated material will go before digging.
The required space changes with the components chosen; CORE’s installation instructions explicitly account for base material, grid height and surface dressing.
Step 4: Prepare the Ground
Inspect the exposed ground against the preparation requirements.
Complete the specified shaping and compaction before covering it. If its condition differs from the plan, resolve that difference before continuing.
Plan excavation, drainage, preparation and edging before ordering surface gravel. Follow the requirements for the specified base or stabilization system.
Step 5: Install Borders and Supporting Components
Follow the chosen assembly’s sequence for edging, separation, supporting aggregate and any leveling layer.
Check dimensions and elevations as the work proceeds. Complete the solid surface zones using their own installation requirements.
Step 6: Install a Grid, if Selected
Use the instructions for the exact model.
Check panel orientation, connections, perimeter details and permitted infill. CORE specifies placement and connection details before filling its cells.
Step 7: Place the Surface Gravel
Confirm that the delivered product matches the order.
Spread it to the planned depth or the grid’s specified filling requirement. Do not use extra surface gravel to disguise a preparation problem.
Step 8: Inspect the Completed Patio
Walk the routes and test the furniture.
Check borders, transitions and the finished surface. After rainfall, inspect whether water behaves as intended.
Keep the product information and installation notes for later maintenance.
How to Keep Patio Furniture Stable
Plan support around the actual furniture.
A solid dining zone is one option to compare when chairs must slide regularly. For furniture placed on gravel, test the feet and support arrangement before completing the entire patio.
If an object needs a prepared support area, include it in the construction plan. Scattered paving units placed casually in loose gravel should not be treated as a designed foundation.
Keep Movable Furniture Out of Critical Routes
Mark the route from the house to the patio and around the seating.
Check it with the furniture occupied. Include enough usable space for the intended users rather than measuring only between empty chairs.
Worked Example: A Patio With a Separate Seating Pad
Consider an illustrative U.S. project with these planning dimensions:
- Overall patio: 12 × 16 feet.
- Separate solid pad: 4 × 6 feet.
- Remaining area finished with pea gravel.
- Illustrative loose gravel depth for volume arithmetic: 2 inches.
The depth is an example input, not an installation recommendation.
Calculate the Gravel Surface Area
Overall area:
12 × 16 = 192 square feet
Solid pad:
4 × 6 = 24 square feet
Gravel area:
192 − 24 = 168 square feet
Only deduct areas that genuinely replace the pea gravel surface.
Calculate the Example Surface Volume
At the illustrative 2-inch loose depth:
168 × (2 ÷ 12) = 28 cubic feet
Using 27 cubic feet per cubic yard:
28 ÷ 27 ≈ 1.04 cubic yards
NIST lists the relevant U.S. customary length and volume conversions. This result covers only the example loose surface layer; supporting materials and justified order adjustments remain separate.
Measure the Border Separately
The rectangle’s outer perimeter is:
2 × (12 + 16) = 56 linear feet
A 4-foot entrance would leave 52 feet of outer edging, plus the separately designed entrance transition. Any internal borders around the solid pad must also be measured.
Do not use patio area to estimate edging length. Check a more irregular layout with the cubic yard calculator; keep uncovered areas and separate materials distinct.
Build the Budget From Local Quotes
Published price examples: compare the same product and unit
| Location / source | Listed product | USD / sale unit | Extra charges and limits |
|---|---|---|---|
| Mansfield, OH · Petty Farms Effective January 1, 2026 | #8 river gravel, pea sized | $31.25 / ton | 7% seller-listed tax unless exempt; delivery not established |
| Bulverde, TX · Blanco Road Mulch 2026 price list; exact effective date not stated | Texas Blend color pea gravel | $130.00 / yard | Tax and destination freight not resolved |
Use your supplier’s current written quote in the calculator. A price per ton cannot be compared directly with a price per cubic yard without a matching bulk density and ton standard. Transport, minimums, tax and installation can change the total substantially.
Request prices for the actual products and quantities.
For the example above, use this worksheet rather than treating a general online price range as a local estimate.
| Budget item | Basis for the quote |
|---|---|
| Pea gravel | Example base volume of 1.04 cubic yards, adjusted only as justified |
| Supporting aggregate | Its own area, specified depth and ordering basis |
| Outer edging | Example 52 feet, plus required connectors and fixings |
| Entrance transition | Its separate construction detail |
| Solid seating pad | Example 24 square feet, including its supporting work |
| Fabric or grid | Actual specified product and covered area |
| Delivery | Required products, loads and access |
| Excavation and disposal | Confirmed work scope |
| Equipment and labor | Required tasks and hire periods |
| Drainage work and tax | Applicable quoted amounts |
Project total = the sum of the quoted material, delivery and installation items.
Mark missing prices as unquoted, not zero. If gravel is sold by weight, obtain the supplier’s conversion for that product.
Check the contractor before comparing the price
Ask for the business name used on the written quote, the work it will perform and the area it serves. A quote website or directory listing is a starting point; check credentials with the relevant authority and confirm the job directly.
- Identity and credentials: match the quote business to the license or registration record where required. California provides a CSLB license lookup; Washington provides an L&I contractor verification tool. These examples apply to their respective states.
- Service area: confirm your project address is covered and ask about travel, minimum-job and mobilization charges. A city in a listing does not establish a delivery radius.
- Work specification: record material, finished thickness, base preparation, drainage, removal, disposal and who obtains any required approvals.
- Accountability: request insurance information, relevant project references, written payment stages, change-order terms, workmanship terms and a named contact for defects.
- Quote scope: distinguish material supply, delivery, spreading, compaction and a complete installed job. Keep a dated copy and confirm its validity before accepting.
For a bulk order, compare seller terms in the gravel delivery guide. For a recurring failure, use the gravel driveway repair guide to describe the problem before requesting a repair quote.
Use the Pea Gravel Calculator for the Order
Once the patio layout and layer requirements are settled, use the site’s pea gravel calculator to estimate the surface material.
Enter the gravel-covered area, the correct depth basis and the supplier’s purchasing information. Keep supporting aggregate and other materials separate.
This patio guide handles the project decisions. The calculator handles the quantity arithmetic. Use the pea gravel calculator to turn the measured gravel area into a separate purchase quantity.
Maintain the Patio by Checking Causes
A maintenance plan should cover the surface, borders and supporting system.
| What you notice | What to investigate |
|---|---|
| Stones outside the patio | Border condition and exit transitions |
| Depressions returning after raking | The affected layer or supporting ground |
| Grid becoming exposed | Required infill and the manufacturer’s maintenance instructions |
| Weeds or soil collecting | Debris accumulation and nearby soil movement |
| Water collecting | The drainage arrangement and any obstructions |
For proprietary systems, inspect and maintain the installed components as directed. NDS specifically calls for periodic damage checks and replacement of affected panels where needed.
Keep a Simple Inspection Routine
After initial use and significant rainfall, check the problem areas.
During regular upkeep, remove debris, inspect borders and review any displaced material. Investigate recurring faults before repeatedly adding more gravel.
Photographs taken from the same positions can help you track changes.
Common Planning Mistakes
Avoid these problems before the work begins:
- Selecting the patio size without testing furniture.
- Assuming water will disappear because the surface is gravel.
- Ordering before the layer arrangement is established.
- Treating all edging products as interchangeable.
- Applying one grid’s instructions to another model.
- Counting the surface gravel as the entire project budget.
- Assuming fabric removes the need for maintenance.
Each mistake leaves a decision unresolved until it becomes more expensive to change.
Your Pre-Installation Checklist
Before work begins, confirm:
- The layout works with the intended furniture and users.
- Routes and entrances are planned.
- Drainage has been addressed.
- Utility locating has been arranged.
- Each layer has a defined material and purpose.
- Edging and transitions have installation details.
- Quantities are separated by material.
- The budget identifies unquoted work.
- Maintenance requirements are understood.
Make a complete patio shopping list
- Layout: footprint, excluded features, furniture landing and route width.
- Preparation: removal depth, reused material, loose spoil volume and disposal destination.
- Restraint: actual edge length, returns, openings, stake specification and finished levels.
- Layers: selected base, optional separator, surface gravel and any exact stabilization system.
- Placement: access, transport, hired equipment, protection of finished edges and planned maintenance.
Measure one net rectangle; mark the furniture contact points before choosing loose stone.
Measure two non-overlapping rectangles. Count edging along the exposed outline, not around both internal rectangles.
Subtract the landing area from gravel coverage; its base and finished height remain separate line items.
These planning layouts describe decisions; they are not built-project photographs. Convert surplus volume to loose depth with the pea gravel coverage worksheet.
Frequently Asked Questions
How Deep Should a Pea Gravel Patio Be?
Establish the surface depth and supporting construction for the chosen assembly.
Loose gravel and grid systems have different requirements. Separate those dimensions before calculating excavation or purchase quantities.
Does Every Gravel Patio Need the Same Base?
No. Ground conditions and the selected system affect preparation.
Use the instructions and site guidance that apply to the actual project, rather than copying a depth from a different installation.
Can You Use Pea Gravel in a Stabilization Grid?
Check the exact product instructions.
CORE’s installation guidance allows pea gravel as an infill option for its system. That does not establish compatibility with every grid on the market.
Will Landscape Fabric Stop All Weeds?
No permanent weed-free result should be assumed.
Soil and organic material can accumulate above a buried barrier, allowing weeds to establish. Continue surface maintenance even where fabric is specified.
Can You Put Dining Furniture on a Gravel Patio?
Test the actual furniture and planned surface.
If chair movement or stability is unsatisfactory, compare a solid seating area or another suitable assembly before construction.
Is a Gravel Patio Automatically Suitable for Wheelchairs?
No. Evaluate the complete surface and route.
The Access Board notes that loose gravel needs adequate stabilization to perform satisfactorily as an accessible surface and may require repeated maintenance.
What Should You Confirm Before Ordering?
Confirm the layout, layer requirements, gravel product, borders, drainage arrangement and purchasing units.
Then obtain a complete quote that includes delivery and the necessary preparation.
Understand the estimate and its assumptions
Read the formulas and worked examples on this page alongside the entered values. Geometry estimates space; density converts volume to mass; product yield converts a quantity to packages. An allowance and supplier purchase rounding are separate adjustments.
Use the same material condition and units as the supplier specification. Enter a local quoted price when pricing work. Missing fees remain unresolved, and a material subtotal does not establish an installed project price. Example values illustrate arithmetic and are not local quotes or construction specifications.
Keep the printed input record with your estimate so a supplier or contractor can check the values that produced it.